 | |
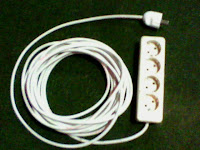
| parallel outlet |
Most people are reluctant to create a new outlet in the wall of his home on the grounds will incur huge costs, and therefore they prefer to buy a parallel outlet which has a number of holes to plug the many complete with plug and its cable, but it is a practical type of outlet can be brought to an extent.
Most outlet that sold in the market there are still many that are far from industry standards, such as the use of the cable diameter is too small or materials working electrical outlet plug finger pinch of low quality resulting ngefong and burning body outlet.
When forced to buy a ready-made parallel outlet, use only for the use of electronic devices which power / watt HP small as chargers, DVD players, speakers and others active. but when will use parallel outlet to power electronic devices / watt big as a refrigerator, washing machine, electric water pump or machine assembles itself suggested parallel outlet in order to choose quality materials and standards. To make it please see the explanation below:
Required equipment:
screwdriver plus
flat-head screwdriver
combination pliers
cutter knife
Ingredients:
Plug / jack plate fitted two fingers for grounding / earthing
Parallel outlet that can accommodate several plugs / plugs.
NYM cable 3X1,5mm fibers or single, long adapted to the needs.
How to assemble: Peel off both ends of the cable using a cutter knife to look three different wire colors are: blue-black-yellow.
Peel off the skin on the ends of the three wires to look for copper wire with a length of approximately 1cm.
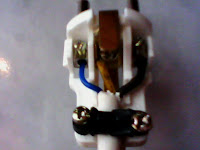
Loosen the screws and open the plug so that the plug body into two parts, loosen the two screws that serve to lock the cable and insert the cable into the locking hole until the end of the cable can reach three screws connecting the cable.
Put a blue and black wires to each terminal baud plug that is connected to both the plug finger.
Connect the yellow wire to the screw that is embedded on a plate that is connected to two small connecting grounding plate located on the outside of the plug body.
Attach the other cable end to the third outlet terminal with screw outlet all the way open.
The third insert the tip of the copper wires to each cable connecting plate. For the blue and black wires mounted on a plate located on the left and right while sisin yellow wire mounted on a plate which is in the midst (which is connected with two small plates that appear on each side of the outlet), this is the plate that will be connected to the grounding plate located on the appliance electronics.
if all cables have been installed at each place correctly and securely attach the back body and screw outlet as before.


No comments:
Post a Comment